Introduction#
The internet now seems to have become a battlefield of cyberspace, with each app operating independently, you occupy a piece of land, and I take another. The banners are clear, and the neighbors are treated as enemies. It has a certain charm reminiscent of the Spring and Autumn period and the Warring States.
This reminds me of a story: before modern Germany was unified, a merchant transporting goods passed through various checkpoints, and the taxes he paid were several times the value of the goods he was selling.
For those of us living in cyberspace, aren't we just like that merchant? Every day I spend coins on Bilibili, listen to music on NetEase Cloud, read public accounts on WeChat, like videos on YouTube, and browse through a chaotic array of bookmarks and "read later" items in my browser. Attention and time are the taxes we pay.
Reorx compares us to information filters in cyberspace, receiving a massive amount of input daily and filtering out the information we want. This metaphor is somewhat terrifying, but it is the reality.
With too much information input, it seems we have liked, collected, and marked many things, only to find that we have forgotten where the information came from.
We need a place to collect and summarize this information, which I call a digital diary of cyberspace.
This article will introduce this topic and guide you step by step on how to achieve this.
What Information to Aggregate#
Presentation Format#
First, let me introduce this aggregation place; I have chosen Telegram:
There are many exciting points about Telegram:
- Create your own channel, similar to WeChat public accounts, with no content censorship.
- Rich message styles, links will automatically preview, and the tagging feature allows for quick searches.
- Instant View feature, which can quickly load an article and store it offline.
- Fun bots and rich API support.
When I compile the records from the apps I have used, I have created the following channel: Raye’s Journey https://t.me/RayeJourney.
Welcome to join 👏
Content Sources#
I have sorted out the apps or information sources I use in daily life:
- Reading: WeChat Reading (recorded through Douban), blogs and forums (Medium, Xlog, recorded through Pinboard + Instapaper).
- Videos: YouTube, Bilibili.
- Watching dramas: Regularly watching dramas on Apple TV, Netflix, HBO, recorded on Douban.
- Music: Spotify, NetEase Cloud.
- Social: WeChat, Telegram, Twitter.
- Games: Xbox, Steam, TapTap.
After sorting, the information sources can actually come from several places:
Bilibili, YouTube, NetEase Cloud, Spotify, Douban, Pinboard bookmarks, Instapaper "read later," Twitter.
Forget about WeChat; it's too isolated, and I don't want to play with it.
Automated Workflow#
There are already many mature automated workflow platforms on the market, such as IFTTT and Zapier.
To avoid overwhelming readers with complicated steps right from the start, we can begin by configuring a workflow with IFTTT.
I often read articles on Medium and either like them or add them to "read later."
Therefore, I want to achieve a workflow where when I like an article on Medium, it automatically syncs to my Telegram channel.
IFTTT, the name of this website is quite interesting, as it stands for "if This, Then That."
If I like an article on Medium, then it automatically sends to my Telegram channel.
Click on if This, search for Medium, and select the first option (i.e., like). At this point, there will be a process to link your account; just click a couple of times.
After adding if This, select Then That, search for Telegram, and add it.
At this point, you need to add your Telegram account and the target chat group or channel (if you don't know how to get the chat ID for a Telegram channel, you can refer to the appendix later).
The final product looks like this:
At this point, as long as we like an article on Medium, it will automatically be sent to the Telegram channel for safekeeping.
Since IFTTT is so useful, why not just use it directly? Therefore, there are the following issues:
- Paid service; free users can only create two workflows and are limited in many ways (such as some Twitter functionalities).
- Platform support varies, lacking customization space.
- Uncontrollable; if the platform goes down, everything is lost 🫠.
Given this, programmers naturally should have an open-source (free) spirit. The following content involves some relatively complicated steps, but if you follow the steps, you can easily complete it. 😉
Open Source n8n#
n8n is an open-source workflow platform that, although it also offers paid features, gives us the space to deploy it ourselves.
n8n has some simple concepts, similar to low-code platforms:
- Workflow: A workflow, for example, if you want to automatically push your liked music from NetEase Cloud to Telegram, it can be understood as an automation task you want to achieve.
- Node: A node, which is a step broken down from the workflow. For example, the above can be divided into several nodes: fetching liked music from NetEase Cloud, processing data, and pushing it.
- Credential: Credentials are used to protect user data; it is not possible to randomly pull anyone's information, so your user credentials are needed.
To deploy a service, you naturally need a cloud server, but now serverless deployment is popular, meaning you don't need to touch the underlying server; you just need to package your application.
Deployment Process#
Database#
n8n recommends using PostgreSQL as the backend storage, so we can choose to use Supabase to create one.
Log in with GitHub and create it; the only barrier is English, but you can also use immersive translation plugins to help.
Obtain the database connection information and save it, as it will be needed later.
Backend Service#
Railway is a container deployment platform and was originally the most recommended. However, during my experiments, the platform's risk control became stricter, and new accounts are not allowed to deploy from GitHub's source code.
But thinking outside the box, there are many container hosting platforms; if you don't let me use it, I don't want to use you either. 😑
I am using the northflank platform; the only barrier is that you need to bind a credit card, but you can easily get a virtual credit card. I believe those who have struggled with ChatGPT payments know how to do this.
I also found a document specifically for programmers to take advantage of, which includes many platforms that offer free quotas, maximizing productivity!
https://free-for.dev/#/?id=docker-related
The deployment process is straightforward; first, fork this code repository:
Create a new service and select the repository you just forked.
northflank will automatically recognize the Dockerfile and detect the exposed port number, assigning a domain name.
Wait 1-2 minutes; after deployment is complete, you should be able to access your service through the generated domain name.
Environment Variable Configuration#
After the backend service is up, you also need to configure the database link we obtained earlier. Just follow the configuration below:
Some configuration items to understand:
- All items starting with
DBare DB configuration information. VUE_APP_URL_BASE_APIandWEBHOOK_URLshould both be filled with the generated domain name (you can also refer to the subsequent steps to change it to your own).N8N_ENCRYPTION_KEYis the key used by n8n for encryption; make sure to generate one and keep it safe.EXECUTIONS_DATA_PRUNEis for regularly cleaning data (such as run records, etc., otherwise the database will explode).
PORT=5678
N8N_ENCRYPTION_KEY=xxxxxx
VUE_APP_URL_BASE_API=https://n8n.app.raye.wiki
WEBHOOK_URL=https://n8n.app.raye.wiki
GENERIC_TIMEZONE=Asia/Shanghai
TZ=Asia/Shanghai
N8N_LOG_LEVEL=verbose
DB_TYPE=postgresdb
DB_POSTGRESDB_DATABASE=postgres
DB_POSTGRESDB_HOST=database URL
DB_POSTGRESDB_PORT=5432
DB_POSTGRESDB_USER=postgres
DB_POSTGRESDB_SCHEMA=public
DB_POSTGRESDB_PASSWORD=database password
EXECUTIONS_DATA_PRUNE=true
EXECUTIONS_DATA_MAX_AGE=72
EXECUTIONS_DATA_SAVE_ON_ERROR=all
EXECUTIONS_DATA_SAVE_ON_SUCCESS=none
EXECUTIONS_DATA_SAVE_ON_PROGRESS=false
EXECUTIONS_DATA_SAVE_MANUAL_EXECUTIONS=false
As shown in the figure, after completing the configuration, the service should restart successfully.
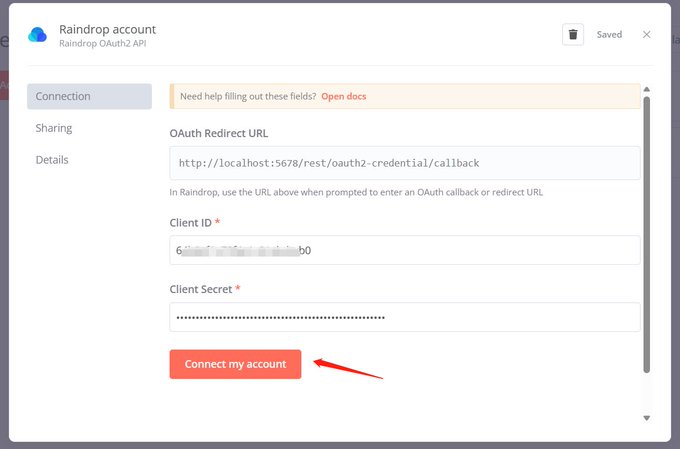
Note the URL configuration in the environment variables; this should be filled with the northflank domain automatically assigned to you. I have changed it to a custom domain later (which means if you change the domain, you also need to modify it here). This domain is used for many OAuth service callbacks, which can be referenced in this tweet:
在使用 n8n 的过程中,遇到这样一个问题,在创建一些 credential 的时候,需要 OAuth,按照文档输入下方的 URL,但是链接账户失败。
Domain Name CDN Acceleration#
This step can be skipped and does not affect subsequent deployments; I just happen to have a domain name that can be paired with Cloudflare's CDN acceleration service.
This might be the only step that requires spending some money; of course, having a domain name is best.
Register a domain name on Tencent Cloud; for example, I registered raye.wiki, then register a Cloudflare account and add the domain (I have already added it).
Cloudflare will require you to verify that this domain belongs to you, so follow the instructions to add a record for verification.
Then we change the DNS resolution server, which can be understood as delegating the domain name resolution task to Cloudflare (the default is Tencent Cloud's free domain name resolution package).
In this way, our domain name is entrusted to Cloudflare, which can help us accelerate access later.
Domain Name Binding#
In northflank, add our domain name; here I choose to assign my subdomain, n8n.app.raye.wiki, and simply add a TXT record for binding.
When binding for the first time, you can initially enable only DNS. Once you can access it normally, you can enable the little cloud from Cloudflare to achieve acceleration.
(Ps. Whether to enable the little cloud for acceleration may require multiple attempts; theoretically, it can be accelerated using Cloudflare. 😅)
Creating a Workflow#
After deployment is complete, regardless of whether you have bound a custom domain or are using the domain assigned to you by northflank, you can access it in your browser, register your username and password (after all, this is exposed on the public internet and will store a lot of credential information).
Then you can start creating workflows to achieve automatic information aggregation. First, let me show you the workflows I am currently running.
Workflows can directly reuse the workflows from Reorx; just import the JSON. Note to separate them into different workflows; do not concentrate everything in one workflow (I initially thought it could be done but later found it would fail to execute).
My workflows for n8n automation
Next, I will introduce them one by one:
Github Stars To Telegram#
Automatically push Github Star information to Telegram (every 30 minutes).
The star information of the Github user is recorded here: https://github.com/rayepeng.atom; just replace it with your username.
Code Node#
The code node is reused from Reorx's code, https://github.com/reorx/n8n-workflows, but his workflow nodes are all old versions. If there are issues running, consider updating to the latest version; it is generally compatible, but some API methods may require an additional $ symbol.
Let me explain the principle of the code:
getWorkflowStaticDatais used to get static stored data. n8n allows storing some data; for example, if we store the latest uid data each time, then when the workflow runs later, it compares the current latest uid with the last stored one. If they are the same, there is no need to push (thus avoiding duplicate pushes).- The input of the node is actually an array of items in JSON structure, and
getIdis used to get the unique identifier of each item, which needs to be modified according to the specific JSON structure in different scenarios. staticData.lastItemIdis used to save the latest id.
const staticData = $getWorkflowStaticData('global');
const lastItemId = staticData.lastItemId;

console.log('lastItemId', lastItemId);
const firstItem = items[0];
let newItems = [];

function getId(item) {
  return item.json.track.id;
}

if (lastItemId) {
  for (const item of items) {
    if (getId(item) === lastItemId) {
      break;
    }
    newItems.push(item);
  }
} else {
  newItems = [firstItem];
}

staticData.lastItemId = getId(firstItem);
return newItems.reverse();
Spotify To Telegram#
Spotify itself provides OAuth authentication, so we just need to follow the instructions of the n8n Spotify node to operate, and the code node is mostly reused.
Pinboard RSS To Telegram#
Pinboard is a bookmark management tool; although it is paid, it is really useful. The page is very simple, so simple that it doesn't even add CSS styles. 🤣
Pinboard also provides a lot of APIs, such as getting the latest added bookmarks, so we just need to check for new bookmarks at intervals to achieve pushing.
The API to get the latest added bookmarks is as follows:
https://api.pinboard.in/v1/posts/recent?format=json&auth_token=xxxxx
Douban To Telegram#
Although Douban does not provide any documentation for APIs, there is a hidden RSS subscription source.
Visit your personal homepage; for example, mine is: 👏🏻 Follow https://www.douban.com/people/162586644/?_i=9643158ntY72-j to obtain the corresponding RSS source.
Linking with RSS Hub#
At this point, you will find that foreign app developers are very considerate, providing APIs for you to call. Although each has its own moat, they are still open.
However, domestic apps are not so friendly; anti-crawling measures are stricter, trying to keep users within their own castles.
But there are still solutions; RSS Hub is such a project, originally intended to make everything into an RSS subscription (thanks to open source 🥰).
It includes RSS subscription URLs for apps like NetEase Cloud and Bilibili. The official documentation is: https://docs.rsshub.app/.
Therefore, we can conveniently deploy an RSS Hub ourselves and achieve information aggregation from related apps!
RSS Hub Deployment#
The official documentation provides several deployment methods: https://docs.rsshub.app/install/#docker-jing-xiang.
But we will still use the free method!
I initially deployed directly using northflank, but due to insufficient resources, it caused the backend to go OOM. So I switched to another serverless platform: https://www.koyeb.com/.
The deployment method is actually very similar to n8n; you just need to create a new project and choose to deploy the RSS Hub GitHub repository.
The deployment result is shown in the image (the domain name is blurred to prevent you from taking advantage of my service 🐶):
Bilibili To Telegram#
After successful deployment, you can obtain the videos you have liked according to the RSS Hub documentation (note that they need to be public).
For example, my liked video link is:
https://rsshub.app/bilibili/user/coin/261764405
This way, you can achieve the push of liked videos from Bilibili (likes and favorites should still be hidden, as there are many girls involved. 😅)
NetEase Cloud To Telegram#
NetEase Cloud is a bit more complicated because it requires your login cookie.
You can refer to the process of obtaining the cookie here: https://github.com/acloudtwei/NewMusic163#%E6%B5%8F%E8%A7%88%E5%99%A8%E6%8A%93cookie.
To briefly introduce:
- Obtain the playlist link:
- Open the browser to log in, and find the value
MUSIC_Uin the developer tools.
- In the serverless platform, configure the corresponding environment variable
NCM_COOKIES.
At this point, the configuration is complete. When you like a song, it will automatically be pushed to Telegram.
Appendix: Telegram Related Configuration#
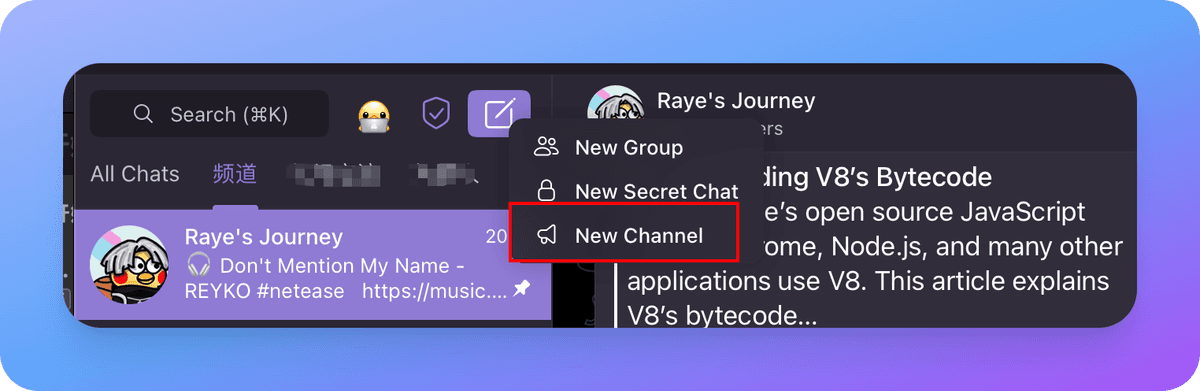
Creating a Telegram Channel#
Click New Channel; it's as simple as that:
Creating a Telegram Bot and Adding it as an Administrator to the Channel#
Essentially, we use a bot to push information, so we need to create our own bot.
The method is simple; search for BotFather, start it, and name your bot.
After creation, you will receive a token for your bot, which you need to keep safe (although you can retrieve it through BotFather if you forget).
After creating it, add it as an administrator to the channel (you can turn off the permission to delete messages; I was too lazy to take a screenshot).
Getting the Chat ID#
This step is a bit complicated; I researched it for a long time.
- First, enter the channel management from here.
- Click the Edit button in the upper right corner and make the channel public (you can hide it later).
At this point, your channel will have a unique name, which you can use as the Telegram node for pushing. However, if you don't want to make it public, continue reading.
- Trigger a message through the API.
Replace the Token and channel name with yours, and send a message.
https://api.telegram.org/bot{Token}/sendMessage?chat_id=@{channelname}&text=test
At this point, you will receive the corresponding content, and the chat ID will be obtained. Finally, hide the channel again, and you are done.
{
    "ok":true,
    "result":{
        "message_id":591,
        "sender_chat":{
            "id":xxxxxxx,
            "title":"Raye's Journey",
            "username":"RayeJourney",
            "type":"channel"
        },
        "chat":{
            "id":xxxxxxxxx,
            "title":"Raye's Journey",
            "username":"RayeJourney",
            "type":"channel"
        },
        "date":1689602624,
        "text":"test"
    }
}
References#
Mainly referenced two articles by Reorx:
https://reorx.com/blog/sharing-my-footprints-automation/
https://reorx.com/blog/0-cost-self-hosted-n8n-with-railway-and-supabase/